Documentation
Libraries
Related
Documentation
Libraries
Related
![]()
This binding has been deprecated - please see the most recent release notes for more information.
In this tutorial you will create a multitouch application that will visually display touch points and their position information in real-time. This tutorial introduces the concept of touch point events, how to consume touch point event data obtained from Gestureworks, and an example of acting on that data.
For this tutorial you will need the Gestureworks Core multitouch framework; a free trial is available.
Download the code for all of the C# & XNA multitouch tutorials here: tutorials_csharp_xna.zip
You may download the API documentation for the .NET bindings in *.chm format here: GestureWorksCoreNET_Help.zip

Time to complete: 30 minutes
In the first tutorial you were introduced to Gestureworks Core, the concept of “bindings,” and you created an empty GestureWorksCoreNET and XNA-based project in Visual Studio. This tutorial assumes you have completed the steps found in .NET & XNA: Getting Started I (Hello World), and that you have a fully configured Visual Studio project ready for use. If you have have not yet done so, please follow Tutorial #1 to prepare a Visual Studio project that includes a reference to the GestureWorksCoreNET project before proceeding.
Open the Visual Studio solution you created in .NET & XNA: Getting Started I (Hello World), and open the Game1.cs file; add a using statement for referencing GestureWorksCoreNET within your project:
using GestureWorksCoreNET;
First add a member field initialized with a new global GestureWorks object. Add the line under the GraphicsDevice and SpriteBatch lines:
  GraphicsDeviceManager graphics;
  SpriteBatch spriteBatch;

  GestureWorks _gestureWorks = new GestureWorks(); // add this line
Now perform the actual GestureWorks object initialization. Add the following to the Initialize() method underneath the //TODO: line, updating the relevant paths for LoadGestureWorksDll() and LoadGML() and adjusting the InitializeGestureWorks() parameters to match your screen dimensions:
  _gestureWorks.LoadGestureWorksDll("C:\\path\\to\\GestureworksCore*.dll");
  _gestureWorks.InitializeGestureWorks(1920, 1080);
  _gestureWorks.LoadGML("C:\\path\\to\\basic_manipulation.gml");
  _gestureWorks.RegisterWindowForTouch(this.Window.Handle);
These four method calls are all that are required to initialize the GestureWorks object.
Note that there is an alternate window registration method, RegisterWindowForTouchByName(), that takes a window title string as a parameter. This may also be used to register the window with GestureWorks, however, it is recommended that the window handle be used whenever possible as it is more explicit.
This implementation of the .NET bindings also requires an update to GwNative.cs to specify the filename of the GestureWorksCore*.dll you are targeting. Update the following line in GwNative.cs with the filename of the DLL you are targeting:
private const string _dllName = "GestureWorksCoreWin8.dll";
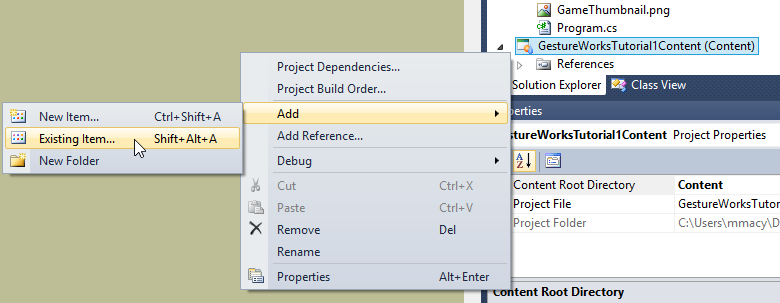
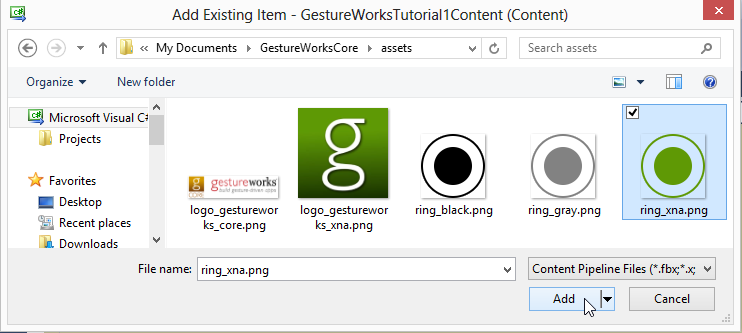
Right click GestureWorksTutorial1Content, click Add, Existing Item, navigate to the texture you wish to use, and double-click it:
For this tutorial we will use the green ring texture, ring_xna.png that is located at
\GestureWorksCore\bindings\dotNET\XNA\assets\ring_xna.png
The texture you selected will now appear in the content project:

We now configure the XNA GraphicsDevice object and set up the SpriteBatch so that we can draw the texture we added above at the GestureWorks touch point locations.
First add a member field for the texture under the GraphicsDevice and SpriteBatch declarations and above the GestureWorks declaration added in step #3:
  GraphicsDeviceManager graphics;
  SpriteBatch spriteBatch;
  Texture2D _texture; // ← add this line
GestureWorks _gestureWorks = new GestureWorks();
Add the following lines to the Game1() constructor (under the Content.RootDirectory line) to further configure the display. Be sure to set the PreferredBackBufferWidth and PreferredBackBufferHeight variables to your screen dimensions.
  graphics.PreferredBackBufferWidth  = 1920;
  graphics.PreferredBackBufferHeight = 1080;
  //graphics.ToggleFullScreen();
It is recommended to leave the graphics.ToggleFullScreen() line commented out for now while you are debugging, otherwise the application can appear to become “hung” if you set a breakpoint or an exception is thrown, thus making it difficult to end debugging in Visual Studio.
Add the code to load the texture in the LoadContent() method underneath the TODO: line:
_texture = Content.Load<Texture2D>("ring_xna");
Add the following line in Update() method underneath the TODO: line:
_gestureWorks.ProcessFrame();
ProcessFrame() keeps the Gestureworks core engine moving along and is necessary for meaningful data to be returned in the form of PointEvents (and, as you’ll see in the next tutorial, GestureEvents). Typically, ProcessFrame() should be called on each frame update such as within an application’s update or draw loop; we’ll act on the updated data in the next step.
You may also want to modify the code in this method that allows the user to exit the application. By default XNA uses the GamePad, however, it is recommended to use the ESC key for this tutorial.
  // Allows the game to exit
  if (Keyboard.GetState().IsKeyDown(Keys.Escape))
      this.Exit();
GestureWorksCoreNET provides GestureWorks touch point and gesture event data via its ConsumePointEvents() and ConsumeGestureEvents() methods (ConsumeGestureEvents() is discussed further in .NET & XNA: Interactive Bitmaps). A “touch point” in the context of GestureWorks is a location on screen representing a single point which a user has touched, and is represented by the PointEvent object. Whenever GestureWorks receives information from the operating system that a touch point has been received, it begins tracking it as a PointEvent. PointEvent objects are obtained from GestureWorks Core via the ConsumePointEvents() method.
In this tutorial we are going to track point events by updating a collection of PointEvent objects based on their added, updated, or removed status, then drawing active points on the screen in the Draw() loop (see step #8).
First, add a List<T> as a private field of the Game1 class to track each PointEvent as received from GestureWorks; this is the collection that we will update when receiving PointEvent data from GestureWorks.
List<PointEvent> _activePoints = new List<PointEvent>();
Now add the following code under the _gestureWorks.ProcessFrame(); line added in the previous step:
  foreach (PointEvent point in _gestureWorks.ConsumePointEvents())
  {
      PointEvent existingPoint = _activePoints.Find(pt => pt.PointId == point.PointId);

      switch (point.Status)
      {
          case TouchStatus.TOUCHUPDATE:
              if(existingPoint != null)
                  existingPoint.Position = point.Position;
              break;
          case TouchStatus.TOUCHADDED:
              _activePoints.Add(point);
              break;
          case TouchStatus.TOUCHREMOVED:
              if (existingPoint != null)
                  _activePoints.Remove(existingPoint);
              break;
          default:
              break;
      }
  }
Here, we loop through all of the PointEvent objects obtained by calling ConsumePointEvents(), updating our _activePoints collection based on the TouchStatus property of each PointEvent returned. We do not perform any other actions with the PointEvent data at this point, doing so instead in the Draw() loop discussed in the next step.
At this point you may want to test the code thus far to ensure we’re receiving touch data. To do so, add a Console.WriteLine to detailing the TouchStatus:
Console.WriteLine(existingPoint.ToString());
Now that we are tracking the point events, we add code in the Draw() loop to actually draw a sprite at each PointEvent.Position. Add the following code to the Game1.Draw() method, between the // TODO: Add your drawing code here and base.Draw(gameTime); lines:
  spriteBatch.Begin(SpriteSortMode.BackToFront, BlendState.AlphaBlend);

  foreach (PointEvent point in _activePoints)
  {
      //Draw the circles at the touch points
      spriteBatch.Draw(
          _texture,
          new Vector2(point.Position.X, point.Position.Y),
          null, //source rectangle
          Color.White,
          0, //rotation
          new Vector2(_texture.Width / 2, _texture.Height / 2), //origin
          1.0f, //scale
          SpriteEffects.None,
          0f); //layer depth
  }

  spriteBatch.End();
To complete the tutorial we will add some text above the TouchPoints to display their real-time position information. Perform the following to see the real-time position data.
First, add the font you wish to use to your content project using the To add a sprite font procedure found on the MSDN website. Note that you should use the name Arial.spritefont in step #2, and you may need to update the <FontName> element in the *.spritefont file that opens up after completing step #2.
Next, add the following code in the specified locations:
Game1 field:
SpriteFont _arialFont;
LoadContent() method:
_arialFont = Content.Load<SpriteFont>("Arial");
Draw() method, inside the foreach loop:
  //Draw the position text above and to the right of the touch points
  string positionString = String.Format("ID: {0}\r\nX: {1} Y: {2}", point.PointId.ToString(), ((int)point.Position.X).ToString(), ((int)point.Position.Y).ToString());

  Vector2 positionStringCenter = _arialFont.MeasureString(positionString) / 2;

  spriteBatch.DrawString(
      _arialFont,
      positionString,
      new Vector2(point.Position.X + 80, point.Position.Y - 40),
      Color.FromNonPremultiplied(96, 153, 6, 255),
      0,
      positionStringCenter,
      0.75f,
      SpriteEffects.None,
      0.5f);
Now, build and run the application (F5) and touch the screen with a finger or two; you should see the position information displayed above each touch point, updated in real-time as you move your fingers around the screen.
If everything is running OK so far, uncomment the graphics.ToggleFullScreen(); line in the Game1 constructor:
graphics.ToggleFullScreen();
…and change the CornflowerBlue background to a more appealing gray in the Draw() method:
GraphicsDevice.Clear(Color.DarkGray);
Now when you build and run the application and touch the screen, it should closely match the image shown here:
In this tutorial we initialized GestureWorks and displayed some sprites on-screen using touch event data obtained from GestureWorks. The initialization of GestureWorks will be performed similarly for every GestureWorks-based application that you create, as are the usage of the ProcessFrame() and ConsumePointEvents() methods. In the next tutorial we will introduce gesture events which are obtained via the ConsumeGestureEvents() method, and will discuss the concepts of touch objects and associating touch points with touch objects.
Next tutorial: .NET & XNA: Interactive Bitmaps
Previous tutorial: .NET & XNA: Getting Started I (Hello World)