Documentation
Libraries
Related
Documentation
Libraries
Related
This binding has been deprecated - please see the most recent release notes for more information.
In this tutorial you will create a multitouch application that will visually display touch points and their position information in real-time. This tutorial introduces the concept of touch point events, how to consume touch point event data obtained from Gestureworks, and an example of acting on that data. For this tutorial you will need the Gestureworks Core multitouch framework; a free trial is available.
Download the code for all of the Java & Processing multitouch tutorials here: tutorials_java_processing.zip

Estimated time to complete: 30 minutes
In the first tutorial you were introduced to Gestureworks Core, the concept of “bindings,” and you created an empty Java Application Project in NetBeans. This tutorial assumes you have completed the steps found in Java & Processing: Getting Started I (Hello World), and that you have a fully configured NetBeans project ready for use. If you have not yet done so, please follow Java & Processing: Getting Started I (Hello World) to prepare a NetBeans project that includes a reference to the gwc_java project before proceeding.
Open the Netbeans project you created in Java & Processing: Getting Started I (Hello World) and open the TouchSketch java class for editing.
Extend the processing.core.PApplet class (base class for all Processing sketches) and override the setup and draw methods. The setup method is called once when the program starts and is used to define initial environment properties. The draw method continuously executes the lines of code contained inside its block until the program is stopped. Both methods are called automatically and should never be called explicitly.
To run the program as an application rather than an applet, pass the specified arguments to the PApplet class.
public class TouchSketch extends PApplet{

    @Override
    public void setup() {
        super.setup();
    }

    @Override
    public void draw() {

    }

    public static void main(String[] args) {
       PApplet.main(new String[] { "--present",
       "gestureworkstutorial1.TouchSketch" } );
    }
}
Set the window’s dimensions and set its visibility to true inside the setup method.
int width = 1920;
int height = 1080;
size(width, height, P2D);
First add an instance variable initialized with a new global GestureWorks object and import the necessary Java bindings.
import gwc.Core;
import gwc.GWCUtils.PointEvent;
…
protected Core gwCore;
Now perform the actual GestureWorks object initialization. Add the following to the setup method to specify the GestureWorksDLL and GML paths, initialize the dimensions to match your window’s, and register the window with the DLL.
gwCore = new Core("C:\\path\\to\\GestureWorksCore.dll");
gwCore.loadGML("resources/basic_manipulation.gml"));
gwCore.initializeGestureWorks(width, height);

long hwnd = ((WComponentPeer)getPeer()).getHWnd();
gwCore.registerWindowForTouch(hwnd);
These four method calls are all that are required to initialize the GestureWorks object.
Note that there is an alternate window registration method, registerWindowForTouchByName(), that takes a window title string as a parameter. This may also be used to register the window with GestureWorks, however, it is recommended that the window handle be used whenever possible.
Since the draw method continuously executes at a scheduled interval (frameRate property), it is perfect for processing GestureWorks frames. Add the following code to the draw loop.
@Override
public void draw() {
    background(169, 169, 169);
    gwCore.processFrame();
    processPointEvents(gwCore.consumePointEvents());
    drawTouchPoints();
}
First, clear the drawing area and tell GestureWorks to process one frame of data. processFrame() tells GestureWorks to evaluate the touch point and gesture event data it has received from the operating system, performing internal pipeline processing such as point, cluster, and gesture updating as well as temporal analysis. Typically, processFrame() should be called on each frame update such as within an application’s update or draw loop; we’ll act on the updated data in the next step.
Then consume any point events that occurred during that frame. gwc_java provides GestureWorks touch point and gesture event data via its consumePointEvents() and consumeGestureEvents() methods (consumeGestureEvents() is discussed further in Java & Processing: Interactive Bitmaps). A “touch point” in the context of GestureWorks is a location on screen representing a single point which a user has touched, and is represented by the PointEvent object. Whenever GestureWorks receives information from the operating system that a touch point has been received, it begins tracking it as a PointEvent. PointEvents are obtained from Gestureworks Core via the consumePointEvents() method.
Next, process the events consumed and draw the desired data to the screen. The processTouchEvents and drawTouchPoints methods will be created in the following steps.
Setup the processPointEvent method to loop through all of the PointEvent objects. Based on the evaluation of the PointEvent status, either add, store, or remove the PointEvent from a hashmap.
private void processPointEvents(ArrayList<PointEvent> events)
{
    for(PointEvent event: events)
    {
      if(event.status == Status.TOUCHADDED || event.status == Status.TOUCHUPDATE)
          activePoints.put(event.point_id, event);
      else
           activePoints.remove(event.point_id);
    }
}
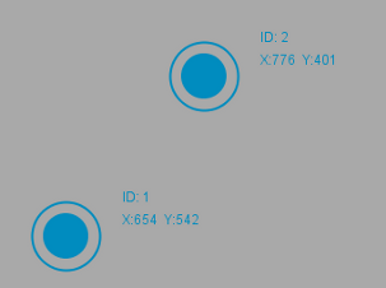
The following method will produce graphical representations of the data we are tracking.
private void drawTouchPoints()
{
    for(PointEvent event: activePoints.values())
    {
        int touchX = (int)event.position.x;
        int touchY = (int)event.position.y;
        ellipseMode(RADIUS);
        smooth();

        //outer circle
        strokeWeight(2);
        stroke(0, 140, 191);
        noFill();
        ellipse(touchX, touchY, 30, 30);

        //inner circle
        fill(0, 140, 191);
        ellipse(touchX, touchY, 20, 20);

        //info
        textSize(12);
        text("ID: "+event.point_id, touchX+40, touchY-20);
        text("X: "+touchX+"  Y: "+touchY, touchX+40, touchY-8);
    }
}
Now, compile and run the application; you should see the position information displayed above each touch point, updated in real-time as you move your fingers around the screen.
In this tutorial we initialized GestureWorks and displayed some sprites on-screen using touch event data obtained from GestureWorks. The initialization of GestureWorks will be performed similarly for every GestureWorks-based application that you create, as are the usage of the processFrame() and consumePointEvents() methods. In the next tutorial we will introduce gesture events which are obtained via the consumeGestureEvents() method, and will discuss the concepts of touch objects and associating touch points with touch objects.
Next Tutorial: Java & Processing: Interactive Bitmaps
Previous Tutorial: Java & Processing: Getting Started I (Hello World)