Table of Contents
Getting Started I (Hello World)
Introduction
In this tutorial you will prepare your development environment for using the .NET bindings for Gestureworks Core. The steps performed in this tutorial will prepare your environment for subsequent Gestureworks Core Unity tutorials. For this tutorial you will need the Gestureworks Core multitouch framework; a free trial is available.
Download the code for all of the C# & Unity multitouch tutorials here: gestureworks-unity on GitHub
GestureWorks Core “Bindings”
The various bindings included with GestureWorks Core allow a developer to create multitouch applications using their preferred language and framework, and are essentially mini-APIs providing an interface to the functions exported by the native GestureWorksCore library (GestureWorksCore32.dll). Source code for each of the bindings is included so that you may extend or modify them as you like, as well as providing a blueprint for creating bindings for other languages or frameworks.
GestureWorksCoreNET and Unity
The .NET bindings for GestureWorks Core can be used by any .NET project. The source code for the .NET bindings is provided for portability and extensibility, but can be used quite effectively as-is in most situations.
In this and the following tutorials, Unity is used for demonstrating GestureWorks Core fundamentals using the .NET bindings. Unity is a powerful 3D game engine that we think you will enjoy using in combination with GestureWorks.
Requirements
Estimated time to complete: 15 minutes
A number of software packages are required for completing this and the following .NET tutorials:
- GestureWorks Core license
- Microsoft Windows 7 or 8
- Unity Pro 4
- Microsoft Visual Studio (C# 2012 Express or Professional)
- .NET 3.5 framework
- Multitouch display device
Process Overview
Process Detail
1. Download and install software prerequisites
- Download and install Unity Pro (NOTE: Gestureworks is only compatible with http://unity3d.com/unity/download/Unity Pro)
- Download and install Visual Studio Express 2012 for Windows Desktop
- Download and install .NET Framework 3.5 (NOTE: The binding is built to .NET 3.5 for compatibility with Mono in Unity 3.5+)
2. Download and install GestureWorks Core package
The GestureWorks Core installer package – GestureWorksCoreSetup.exe – contains the main GestureWorksCore.dll files (the “native” DLLs), various bindings (C++ .NET, Python, etc.), and supporting documentation. GestureWorksCore must be licensed prior to use in any software project.
- Download the GestureWorks Core Trial package from here.
- Double-click the downloaded installer package GestureWorksCoreSetup.exe to install GestureWorks Core. GestureWorks Core consists of the GestureWorksCore DLLs as well as various tutorials, bindings, and documentation.
GestureWorksCore*.dlls
\GestureWorksCore\GestureWorksCore32.dll
.NET bindings
\GestureWorksCore\bindings\dotNET\GestureWorksCoreNET
.NET documentation (*.chm help file)
\GestureWorksCore\bindings\dotNET\GestureWorksCoreNET\docs
Unity tutorials
\GestureWorksCore\bindings\dotNET\tutorials\unity
Assets for the tutorials
\GestureWorksCore\bindings\dotNET\tutorials\unity\assets
3. Create a new project in Unity
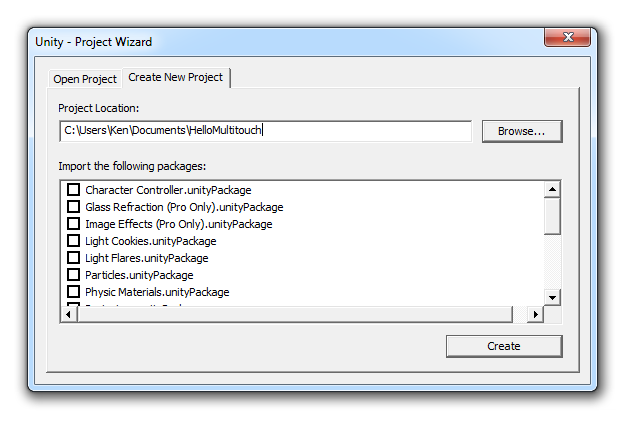
To get started, open Unity and create a new project in the File > New Project menu
We will call our project in the next lesson Hello Multitouch, so please enter that name in a location that is most convenient. There are no extra package imports to check in the project creation wizard so after naming the project, press Create.
4. Add Gestureworks binding to the Assets directory
New folders and files are automatically created by Unity when creating a new project. The default folder structure in the root HelloMultitouch directory is as follows:
  \Assets
  \Library
  \ProjectSettings
  \Temp
The Assets folder is the location where you will be putting all your project specific items. Use the file explorer to create the following nested folder path inside Assets:
Assets\Gestureworks\Core
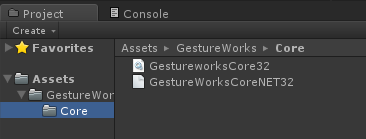
Inside the Core directory, place GestureworksCore32.dll. Then copy the .NET binding called GestureWorksCoreNET32.dll inside the same directory. Your Core folder should have the following inside:
  GestureworksCore32.dll
  GestureWorksCoreNET32.dll
Go back to Unity and see if the GestureWorks folder appears in the project view window. If you successfully placed everything correctly, your Hello Multitouch project window in Unity should look like the screenshot below:
5. Build Settings
Save your scene to the main assets directory and give it the name MyScene. Then set your build settings by going to File > Build settings. Specify the build as Windows x86. Also add the current scene. Your build settings should look like the ones below.
6. Review and complete
After you have successfully installed and configured Unity along with Visual Studio, you will be ready to move on to the next tutorial: Hello Multitouch.
Next tutorial: .NET & Unity: Getting Started II (Hello Multitouch)


