Documentation
Libraries
Related
Documentation
Libraries
Related
![]()
In this tutorial you will prepare your development environment for use with the Java bindings for GestureWorks Core. While no code will be written in this tutorial, the steps performed here will prepare your environment for subsequent GestureWorks Core Java tutorials. For this tutorial you will need the Gestureworks Core multitouch framework; a free trial is available.
Download the code for all of the Java & Java 2D multitouch tutorials here: tutorials_java_java2d.zip
The various bindings included with GestureWorks Core allow a developer to create multitouch applications using their preferred language and framework, and are essentially mini-APIs providing an interface to the functions exported by the native GestureWorksCore library (GestureworksCore32.dll, GestureworksCore64.dll). Source code for each of the bindings is included so that you may extend or modify them as you like, as well as providing a blueprint for creating bindings for other languages or frameworks.
The Java bindings for GestureWorks Core can be used by any Java project. The source code for the Java bindings is provided for portability and extensibility, but can be used quite effectively as-is in most situations.
In this and the following tutorials, NetBeans IDE 7 is used for demonstrating GestureWorks Core fundamentals using the Java bindings. Java2D is Java’s native drawing framework providing two-dimensional graphics, text, and imaging.
Each of the following software packages must be downloaded and installed prior to continuing with the tutorial.
The GestureWorks Core installer package – GestureWorksCoreSetup.exe – contains the main GestureWorksCore.dll files (the “native” DLLs), various bindings (C++, .NET, etc.), and supporting documentation. GestureWorksCore must be licensed prior to use in any software project.
GestureWorks Core consists of the GestureWorksCore DLLs as well as various tutorials and bindings:
GestureWorksCore*.dlls
\GestureWorksCore\GestureWorksCore32.dll
\GestureWorksCore\GestureWorksCore64.dll
Java bindings
\GestureWorksCore\bindings\java\gwc_java
Java tutorials
\GestureWorksCore\bindings\java\Java2D\tutorials
Assets for the tutorials
\GestureWorksCore\bindings\java\resources
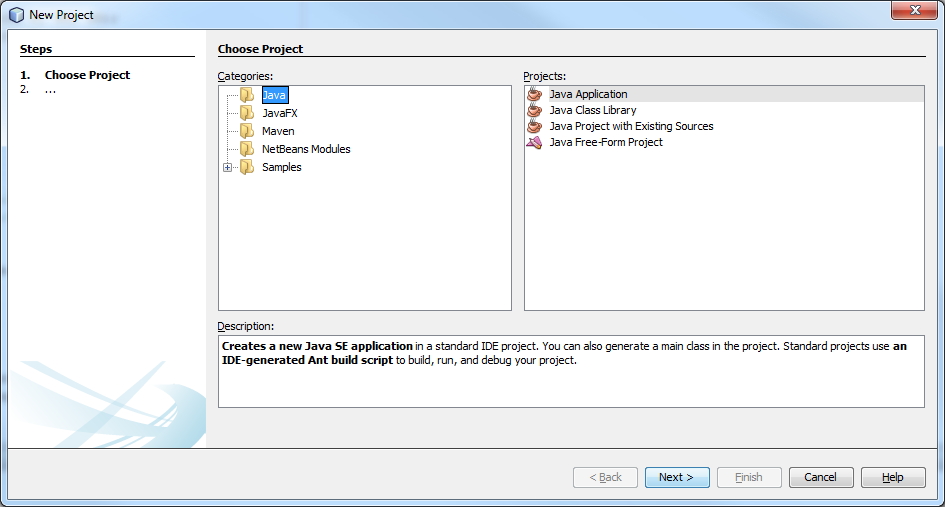
First, create a new Java project

Next we need to add the following dependencies to the project. After a few edits, you’ll be able to start using the Java bindings to work with GestureWorks Core.
Open the gwc_java project and select the “Clean and Build” option to build the jar file in the project's “dist” directory (https://netbeans.org/kb/docs/java/quickstart.html#build). Right-click on the project in the Projects Explorer, then click Properties → Libraries → Add Project…

Browse to the folder containing the downloaded GestureWorks Core files, navigate to the gwc_java bindings folder, click on the file and click Add Project JAR Files.

Now add the jna.jar by selecting the Add JAR/Folder in the ProjectProperties window, navigate to the same gwc_java bindings folder, select jna-3.5.1 and click Open.
The last dependency we need to add is the resource files. Navigate to and copy the folder located at \GestureWorks\bindings\java\resources. Click the Files tab in NetBeans to switch to the Files view, right click on the root project folder, and click Paste.
The project and file tree structures should appear as follows, indicating the successful addition of the project libraries and resource folder. This will allow using the gwc_java binding’s code and local resources in the following tutorials.


If the project’s platform is not targeting a compatible JDK, the platform settings will need to be configured. A 32 bit DLL requires a 32 bit JDK and a 64 bit DLL requires a 64 bit JDK.

In this tutorial we installed GestureWorks Core, the prerequisites for developing with the GestureWorks Core Java bindings, and created a project that includes the Java bindings project. From here we move on to Java: Getting Started II (Hello Multitouch) in which we dig into actual source code, initializing GestureWorks Core and working with touch and gesture event data.
Next tutorial: Java: Getting Started II (Hello Multitouch)