Documentation
Libraries
Related
Documentation
Libraries
Related
![]()
In this lesson, we will be touch-enabling two textures using the gesture processing of GestureWorks Core. We will show you how to touch and drag, rotate, scale, and tilt blue colored versions of the GestureWorks logo. For this tutorial you will need the Gestureworks Core multitouch framework; a free trial is available.
Download the code for all of the C# & Unity multitouch tutorials here: gestureworks-unity on GitHub

Estimated time to complete: 45 minutes
This tutorial builds upon the last where we utilized the point event data to display touch rings on the screen. Making use of gestures is where the real power of the Core lies. If you have been following along from the first tutorial, you should have your project set up to connect to GestureWorks Core and process point data gestures.
To successfully complete this tutorial, you will need to download and install the required items outlined in the first tutorial and start with the resources from the previous tutorial.
The image file Unity.png will need to be copied from the tutorial assets to inside your project’s Assets\Textures folder.
A basic understanding of Object Oriented Programming
Duplicate the previous tutorial’s files as a starting point for this one.
Build and run to make sure you see the same thing as was present in the last tutorial. Change the name of the game by going to Edit→Project Settings→Player→Product Name and setting it to InteractiveBitmap.
Run the game both in the simulator and as a standalone executable. If all works as last time, please proceed on to setting up the GestureWorks logo.
NOTE: We are going to keep the touch and mouse points showing as in the previous lesson. While this feature is not a requirement for this tutorial, it will help to aid debugging during this tutorial.
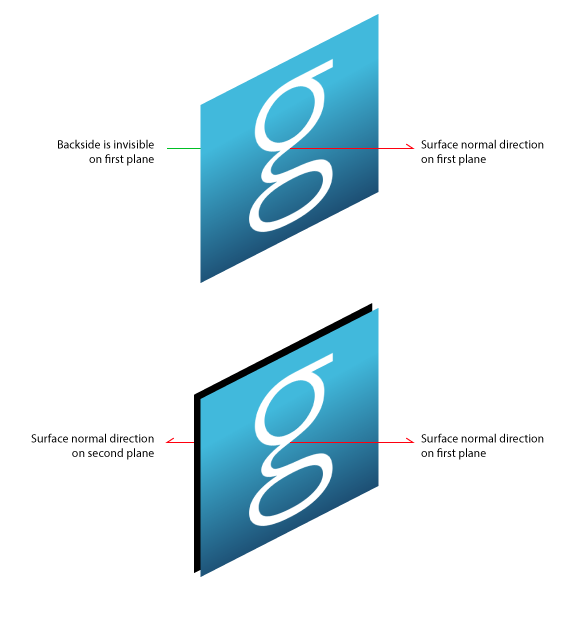
First, be sure to copy the Unity.png file into your projects Assets\Textures folder. Next create an Empty GameObject and name it Bitmap1. We will use this empty object to contain two planes from which we will texture. Since we will be able to spin the bitmap around to the other side, we need two planar surfaces with textures’ surface normals pointing in opposite directions. If we were to look at the texture in the negative side of the normal for one plane, the texture will not be displayed; thus, two textures are needed to display the bitmap in each direction. The following graphic illustrates this point:
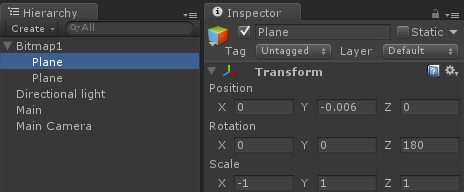
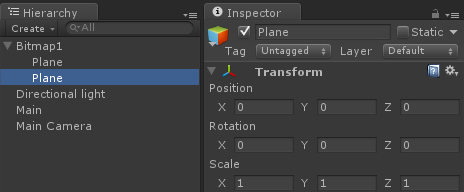
Create two planes and click and drag them onto the Bitmap1 empty object. Next click and drag the Unity texture onto each plane. Adjust the rotation and position of the planes so that they stack on top of one another. Here are the values that are used in this tutorial.

The bitmap will probably be dark, so you will want to add a directional light to see more clearly (GameObject > Create Other > Directional Light). Position this light in a general location and adjust the brightness to your liking.
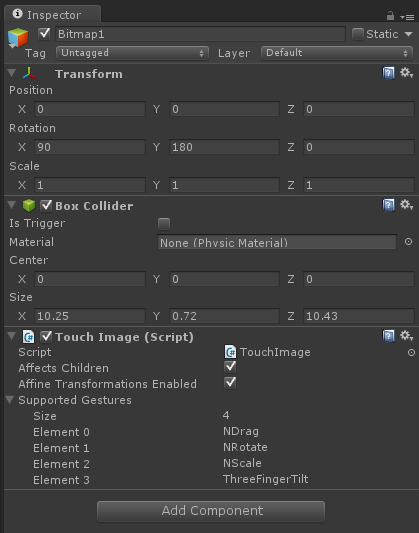
Next, add a box collider to Bitmap1 (Component > Physics > Box Collider) and adjust the size values to the following:
  X: 10.25
  Y: 0.72
  Z: 10.43
The box collider should look like this when finished:
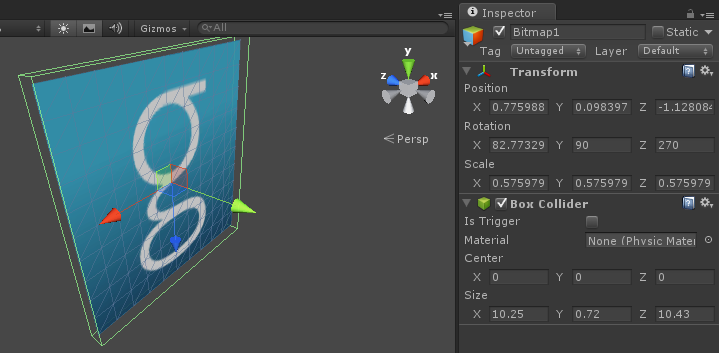
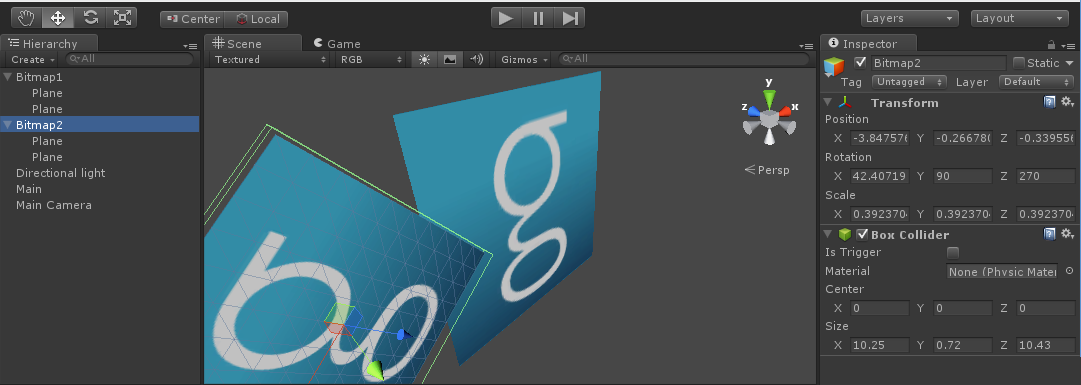
And the camera should be oriented such that in game view Bitmap1 looks like the following:

Now duplicate Bitmap1 and rename the copy to Bitmap2. Adjust the second bitmap to your liking or similar to the photo below:
Now that we have the 3D objects set up for multitouch interaction, we will now move on to adding the scripts necessary to make the bitmaps touch-enabled. Before we write more code in the main file, Let’s explore the GestureWorks Unity classes imported from the asset package..
Inside the GestureWorks/Unity, you will find class files titled TouchObject.cs and HitManager.cs. The TouchObject is a special class that will be used to make 3D objects touch-enabled. It has public properties that identify gestures associated with this object. TouchObject may only be extended and is enforced with being defined as abstract.
The HitManager class is used to find touch point intersections of 3D objects in the scene. Unity’s built-in Raycast method is used to detect hits. More optimization of this class is encouraged for scenes with more objects in them.
The next step is to create a class file that inherits from TouchObject. We will call this class file TouchImage.cs. The class should have the following defined:
using UnityEngine;
using System.Collections;
using GestureWorksCoreNET;
using GestureWorksCoreNET.Unity;

public class TouchImage : TouchObject {

    void Start () {
        // initalize anything else you need
    }

    void Update () {
        // You could add other frame-by-frame processing here.
    }


    public void NDrag(GestureEvent gEvent){ }
    public void NRotate(GestureEvent gEvent){ }
    public void NScale(GestureEvent gEvent){ }
    public void ThreeFingerTilt(GestureEvent gEvent){ }
}
The methods of NDrag, NRotate, NScale, and ThreeFingerTilt will be fleshed more below. But one thing to note now (and will be explained more later) is that these method names correspond to how GestureWorks is configured in the GML file.
Click and drag the TouchImage.cs script to Bitmap1 and Bitmap2. Configure the script with the following “Supported Gestures” array:
You will need to type in the size first and then focus the cursor on each element value. The element values should correspond to the gesture handler methods defined in TouchImage.cs. Type in the values listed above for both bitmaps.
The “Supported Gestures” will eventually be registered with the GestureWorks core in the GestureWorksUnity class. These gesture may also be assigned in the TouchImage class but we will use Unity’s configuration for ease of use.
We are going to move aside from all the code we have been writing and talk a little about the role of GML. When we originally started the HelloMultitouch tutorial, we included a file called my_gestures.gml. This file is critical to how GestureWorks Core interprets touch point data.
Go ahead and open this file to see what is inside.
You will find many xml declarations that configures GestureWorks. Note that some ids correspond to the method we defined in the TouchImage class–ids like NDrag, ThreeFingerTilt, NRotate, NScale. Inside each Gesture node you will find criteria for how gesture processing takes place. We encourage you to experiment with how the XML is defined but note that there is no syntax checking built into our Core yet. Consult the GML wiki before experimenting to ensure the best possible experimentation.
NOTE: If the GML is malformed, GestureEvents will not come in properly.
Now that we have gesture processing setup, we need to define how the method handlers respond when gestures occur. When we setup TouchImage, we only created method stubs. In this section you will need to fill out the methods for TouchImage with the following:
public void NDrag(GestureEvent gEvent){
    float multiplier = 1.0f;

    float dX = gEvent.Values["drag_dx"];
    float dY = gEvent.Values["drag_dy"]*Flipped;

    Camera cam = Camera.main;

    Vector3 previousPosition = cam.WorldToScreenPoint(transform.position);
    Vector3 nextPosition = new Vector3(dX, dY, 0.0f);
    Vector3 newPosition = previousPosition + nextPosition;
    transform.position = cam.ScreenToWorldPoint(newPosition);
}

public void NRotate(GestureEvent gEvent){

    float dTheta = gEvent.Values["rotate_dtheta"];

    transform.Rotate(0, dTheta, 0);
}

public void NScale(GestureEvent gEvent){

    const float multiplier = 0.005f;
    const float scaleMin = 0.1f;

    float scaleDX = gEvent.Values["scale_dsx"]*multiplier;
    float scaleDY = gEvent.Values["scale_dsy"]*multiplier;

    Vector3 newScale = transform.localScale + new Vector3(scaleDX, scaleDY, scaleDY);
    newScale.x = Mathf.Max(newScale.x, scaleMin);
    newScale.y = Mathf.Max(newScale.y, scaleMin);
    newScale.z = Mathf.Max(newScale.z, scaleMin);

    transform.localScale = newScale;
}

public void ThreeFingerTilt(GestureEvent gEvent){
    Camera cam = Camera.main;

    float tiltDX = gEvent.Values["tilt_dx"];
    float tiltDY = gEvent.Values["tilt_dy"];

    transform.Rotate(0,0 , tiltDX * Flipped);
    transform.Rotate(tiltDY * Flipped,0 , 0);

}
Each method handler makes use of the gEvent parameter to manipulate the object. We use the change in property value (deltas) and map it to the right 3D object properties.
Notice that the Y axis needs to be flipped to correspond to Unity’s 3D world coordinates.
Everything should be set to build and run. Touch the bitmaps with different gestures and see how the image updates in a natural and expected way.
One thing to keep in mind is that once an object is flipped (through the three-finger tilt gesture), some transformations get reversed. As a challenge, try detecting the orientation and manipulate the object differently.
There will be a future lesson with a 3D clock that introduces how more constraints and object manipulators may be added to objects.
Next tutorial: .NET & Unity: Interactive Clock
Previous tutorial: .NET & Unity: Getting Started II (Hello Multitouch)